Showing posts with label des feliciano tutorial. Show all posts

Wednesday, December 31, 2014

Taking the leap into the year of the sheep!

Jan 1, 2015 How time flies! To celebrate the new year I made an illustration of a fluffy sheep! :) 2014 has been awesome and I'm looking forward to 2015, this year I have bigger and better goals. One of them is to improve my skill, so I will be making time to enroll at an online course, read more art books, create more art, and share my learnings in this blog. :) I have made a learning fund from my budget. I really wanted to get Imaginism studios' classes & SVS online course on children's book illustration, I'm still looking on how to afford them both but from my current income I can only afford one per year.

I want to improve my character poses making them more dynamic and relatable and also the character expression (I think I need to look at the mirror more often). And do a lot of drawing from life, and outdoor sketching. :)


Below are the steps on how I made this illustration. Start off with the usual grayscale illustration to get the values right. Then slowly adding colors by adding another layer of color overlay and build up the colors from there.


I hope this new year brings more blessings and learnings to you. And I want to thank you for reading my posts through the years! :) 


Friday, February 7, 2014

Exotic illustration step by step tutorial

Welcome to another series of step by step tutorial. 
I did this digital painting of monkeys in a jungle for my exotic entry for Illustration Friday. :)
This illustration was quite a challenge, since there are a lot of characters in the artwork. Doing different expressions and making the artwork blend together was my main challenge here.

steps in animation

I started out with a simple line sketching in photoshop. These are very loose quick strokes just to position the elements, these are just guides and will be deleted later on. Next step is to create another layer to make the line drawing. Then blocking out the shapes using base tones. Checking how dark or light the image is. 


Next is coloring the artwork, initially I wanted the monkeys to be blue, to make them look exotic, but when I look at it, they don't blend with the artwork well. So I changed them to brown but made their faces blue. :)


Next are the monkeys!!! This took a while since each monkey has a different character. I only use one brush for this piece adobe photoshop round brush with opacity 50% and flow at 20%.


When I'm done with the details I look on the overall and checked the lighting using photoshop's auto tone and contrast. And it's finished! :)


Saturday, November 30, 2013

Flower Girl Watercolor Painting Process

I can’t believe it’s the last day of November already! Christmas is fast approaching and I’m wondering what happened to my time?! Oh yeah I watched a lot of anime and did overtime every other day. This month I only did 2 watercolor paintings (Des where are your priorities?!).  I did however collated my artworks and made them postcards to sell this Christmas. Extra income here I come! :)

So without further much ado, here’s my flower girl artwork. By the way this will also be part of the postcard collection. Let me know if you are interested to buy. :)


 My inspiration for this artwork was the lime and purple sketch I made. This painting started out as very loose. I used the wet on wet technique using yellow as my base color adding greens and blues sparingly. Next I added pink and yellow for the flowers (Duh!).  At this point I don’t worry about the details yet. These are mostly light so I can paint over them later if ever I’m not happy with some parts. Then I take a break and let the artwork dry.


After the colors are set only then did I start going over the details. This is the part where you don’t realize that you’re holding your breath and sticking out your tongue to make the lines perfect! ☺ This takes about 70% of my painting time.


When doing the details I usually step back to look at the big picture. Looking at the artwork from afar helps me judge if the elements blends together. Adding a flower here will make it more balanced, or having more space at the top let’s your eye rest from all the elements at the bottom. When I step back and see that I have nothing more to add then for me the painting is finshed already. Sometimes it takes just 2 hours sometimes it takes years for me to finish a project. You’ll just know it that feeling that it’s done. ☺

Saturday, October 12, 2013

Purple & Lime

My cousin recently asked me to do a background illustration for their wedding. Their theme colors are purple and lime, I liked the color combination so much I used it on my watercolor illustration as well. :)


I was browsing my sketchbook and this illustration was just waiting to be colored. :)


I started our blocking the shapes and left it to dry. (meaning I slept)


And the next day I added the details using a 0brush. 
I also used watercolor pencils for the flowers.


And it was done! :) I'm thinking of doing bigger version of this.


Monday, September 9, 2013

Ollie & Timmy Speedpainting Video

Yay done making this time lapse video, I intended to post this before our exhibit last august, but alas procrastination got  in the way :(. This Illustration will be the cover of the children's book I illustrated, the story was written by the awesome Sofia Santiago. It will be published digitally, hopefully this September by Halo-halo books. :) note: i don't paint this fast! this took me about 3 hours and compressed it to 3 mins. I hope to get a better quality video next time, most of the details are lost in the video. :(


Saturday, May 25, 2013

Eagle watercolor process

Have been busy with work lately, but finally managed to squeeze in this eagle commish (1 down 2 more to go yay! :) ). Okay now back to work.

the final artwork

details adding dots and lines

step 1-2-3 

Sunday, April 7, 2013

watercolor workshop 1

I just want to share my watercolor workshop session. this is our first session we created landscape art using different watercolor techniques. :)


Sunday, February 24, 2013

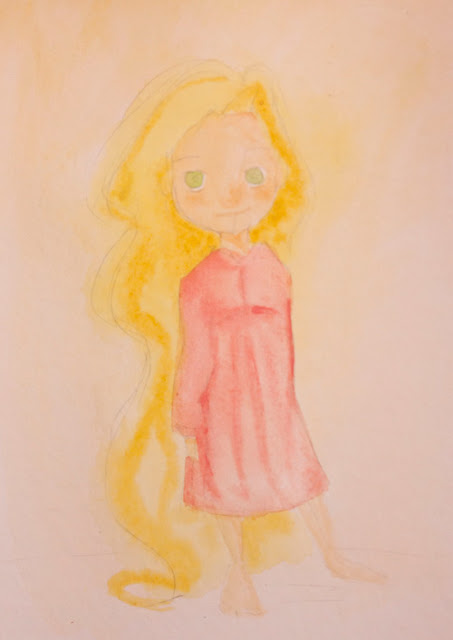
the making of lil rapunzel

Tangled steps. Welcome to another tutorial. Today we will go through my process of creating rapunzel. :) 

Messy photo of my workstation.

First step sketch it.


Step 2 : Wet on wet base color. It means I wet the paper with just plain water, then add the color.


Step 3: Let it dry.  Patience is a virtue. You can play temple run first. :)


Step 4: With a fine brush add the details, dry paper with wet brush, hence dry on wet technique. :)


step 5: Asses your work, on the last minute I decided to add the birds. :)


step 6: Give yourself a treat! yay!


Saturday, January 26, 2013

Help me name this piece

Finally found the time to squeeze in a blog post! I have been planning to do it this morning, but after my exercise, breakfast and bath, I just went back to bed. :( Then I watched blueberry nights (which my friend is itching for me to watch). And now I want a blueberry pie! So anyway I'm back, this piece is yet to be named (maybe you could help me name this one.).


I started with light colors (meaning lots of water than paint) gradually darkening some of the parts (less water or directly from the tube). Then I added the details using pencil, usually I only use darker shades of watercolor or gouache to add the detail, but I decided to try something different and see how it goes. 


I like the effect of the pencil. The only challenge I got are the pencil smudge marks, (you know when you draw, the graphite transfers to your hand) to solve this problem I placed paper on top of my artwork so everything will be clean. And that's it. :) 


Saturday, December 29, 2012

Christmas Card Illustration Process

As promised here's the process for this project. This was a design for the Christmas carolers thank you card. Here in the Philippines this is a tradition. Everyone young and old will jump from house to house singing, and the house owners if they like your singing will give you money in return. When I was a kid my siblings and I will get/create musical instruments like stringing bottle crowns together, creating drums from discarded milk cans, or if there really is no time, I just get a spoon & fork and bang them together! And that was the end of my singing career. :) Okay enough flashbacks.

SKETCH
I started with a very quick sketch (I did the sketch on the first paper I got my hands on, I can't find my sketchpads anywhere so the notebook it is! ) The sketch/doodle is very rough, just to get the layout. Next I transferred it on watercolor paper here I refined the line art.

sketch


COLOR
After the detailed sketch I started blocking out the colors, I used watercolor for the sky & tree and used the gouache for the rest. I wanted a colorful opaque style for this, more like a vector feel. Okay if you are looking at my sketch & my colored piece intently like your life depended on it (which I doubt), you will see that I removed an element in the background. What you didn't notice?! I decided to remove the kid & dad in the background so the user will focus on the carolers, KISS (keep it simple stupid). :)


DETAIL
After I blocked the colors I added the details, line art, which needs a lot of concentration... and not breathing... and tongue sticking out on my part.


FINAL ART
And after a couple of hours tadaaaa! I would like to present my present! (get it!) I hope you had a blessed Christmas!


Saturday, December 1, 2012

Peek watercolor process

Here is my watercolor step by step process for making my latest artwork peek!
This was inspired by studio ghibli's The Borrower Arrietty.


 I really love this animated film... anyway back to business, I started this one out with a concept in my head and directly sketched it on the watercolor paper (I know this is not the advisable way to do it, I just got so excited that I decided to directly do it on the canvas). Then I added a warm yellow wash and started painting the leaves. I got carried away and forgot to take a photo of my initial process, sorry guys. My color palette was mostly warm greens, yellow and red because I want it to have a magical glowing feel.


 Next step I painted the cute little girl peeking out of the giant mushroom. The trick with watercolor is to do the coloring with very light tones first (to do this just add copious amounts of water) and add the dark tones little by little, since the magic of watercolor lies in its transparency. :)


After that I added the details, shadows and texture on the girl, leaves, flower & the mushroom. And then I was done. Hooray!


That's all there is to it. If you find this tutorial helpful please comment or share.